Craft a Vintage Sweet Cart | Perfect For Wedding Favours & Centrepiece's


This beautiful die set makes fabulous Sweet Carts which can be used as table centres for weddings, parties or as gift boxes.
You’ll need the following

- Scrumptious Sweet Cart Showcase die set
- Craft Perfect 300gsm Smooth Bright White Card
- Craft Perfect 216gsm Classic Card, Chilli Red, Ballet Pink, Pistachio Green
- Nuvo Deluxe Adhesive
- Craft Perfect 3mm Chilli Red Ribbon
- 2 small brads/split pins
Step 1

1. Die cut all of the pieces shown at the top of the instruction sheet in your die set.
Score and fold both Sweet Cart Bases as shown. Set one base aside.
Step 2

2. Glue along the long glue tab to attach the base together.
Step 3

3. Die cut 4 Canopy Posts and trim 2 at the debossed lines. Burnish the score lines and fold in, gluing one long tab on each and creating tubes.
Step 4

4. Feed the 2 longer canopy posts through the square tab apertures at the front of the cart until the small score line is level with the bottom of the card. Adhere the glue tabs to the posts.
Step 5

5. Feed the 2 shorter posts through the remaining top face square tab apertures until they line up with the bottom of the box. Adhere the sides of the posts to the inner box and attach the side glue tabs to the posts.
Step 6

6. Match up 2 sets of decorative handle die cuts so that they will fit together back to back. Remove the glue tabs from the back one of each set and glue each pair together as in the top right of the photo.
Step 7

7. Fold and glue the tabs to the cart as shown. Repeat on the other side of the cart.
Step 8

8. Die cut the Open Me aperture into one of the side panels.
Step 9

9. Glue the Open Me panel to the rear of the cart.
Step 10

10. Glue the plain panel to the front.
Step 11

11. Burnish the score lines on the canopy front and side panels.
Step 12

12. Adhere the 2 canopy die cuts together by the glue tabs in the centre.
Step 13

13. Attach the canopy side panels in place and then create 2 panels using both dies shown to decorate the canopy. Glue these in place on each side of the canopy.
Step 14

14. Glue the Canopy Front and Side decorative strips in place and add dots of glue into the inside corners of the canopy.
Step 15

15. Attach the canopy posts to the dots of glue to hold the canopy in place.
Step 16

16. Take the 4 wheel holder die cuts and glue together in pairs.
Step 17

17. Glue the wheel holders in place with the little score lines level with the base of the cart, on both sides.
Step 18

18. Trim away the side panels from the remaining Sweet Cart Base die cuts. Glue these to each side of the cart to cover the wheel holders.
Step 19

19. Take the 10 wheel die cuts and glue 5 together to create one wheel. Repeat. Attach one wheel to each wheel holder with a brad/ split pin.
Step 20

20. Use the dies shown to create the decorative side panels and adhere one to each side of the cart.
Step 21

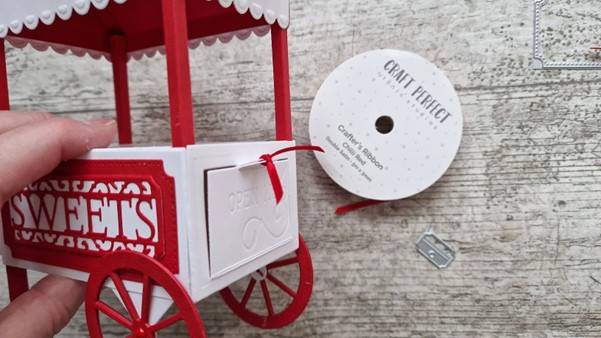
21. Fold the little decorative tabs in half and glue to the opening panel as shown.
Step 22

22. You can keep this panel closed with a knot/bow of ribbon.
Step 23

23. Decorate the cart with die cut bunting and flowers.
Step 24

24. Add die cut balloons to the back of the cart.

You can see how I made a second Sweet Cart in my video
Buy The Craft Project


